Näytetään tekstit, joissa on tunniste star wars. Näytä kaikki tekstit

sunnuntai 19. joulukuuta 2021

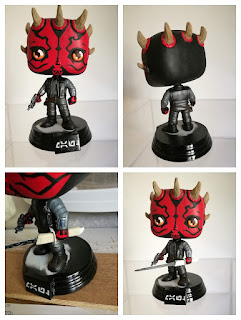
Funko Pop Custom: Darth Maul


The *insert obligatory excuse of winter depression for why this blog has again been quiet for a few months* here.

Hey! I also made a shitty slideshow video of this project and put it up on YouTube for nobody to enjoy:


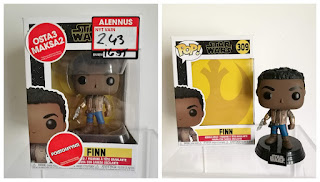
Anyway, it all started when I found this Funko Pop of Finn, Star Wars Episode 9: The Rise of Skywalker -version, during GameStop's Nordic branch going out of business sale. The figures original price was close to 17 euros, but now I got it for only 3€! Can't beat that price!

I have been wanting to make a custom figure for a while now, something more extensive rather than just a repaint with no modifications. So, I thought the best place to start was with a cheap figure of a character I don't particularly care for. (Finn had the potential to be a great character, but they wasted it all in the movies, but I digress...)

Finn was also chosen because the figure happens to have short hair, which meant less work for me when the time came to shave it down to make room for Maul's horns and bald head.

All Star Wars Funkos are bobble heads due to some licensing issue or something. I don't want that. So, I'm going to make the figure a new stable neck with no springiness. The first thing to do was to take the head off. 

I pulled on the head to get the metal wire to uncurl enough for me to get some pliers inside to cut the wire. The wire is surprisingly strong and it took some effort to get it all out.


Following the decapitation, I started to shave down the hair texture to get it as flat as possible.


I don't remember what the big idea was why I tried to remove the eyebrows, but the end result was a hilariously huge,messy unibrow.

Next up, I drilled a hole in the closed hand where I wanted the lightsaber to go. For extra detail I also cut out an opening in the holster which was closed off before.


I took a white pen to the head and sketched on the tattoos in order to get a better idea for the placement of the horns. I drilled some holes and put in some metal wire to act as a base for the clay later. I secured the metal wires with hot glue inside the head. In hindsight, I made a real mess inside the head with all the wire and hot glue, which doesn't look pretty at all. That's when I came up with the idea to cover up the neck hole with a plastic cap. It's not perfect, but it does its job.


I used a wooden dowel to make a new neck peg for the figure. I cut the dowel in half, used a pencil sharpener to make the other end smaller to fit in the hole inside the head. I drilled a hole in the dowel and the figure's neck and inserted a metal wire to hold everything in place. The wooden dowel is glued inside the head, but as I was still going to do a lot of work on the head so I never glued the wire to the dowel in order to keep the head removable for now.


I knew I wanted the base to be a little bit different, so in preparation, I removed the Star Wars logo off the base with some acetone and then sanded it down. Instead of the Star wars logo I wanted the base to have Maul's name on it written in Aurebesh (SW universe's alphabet) so I made a tiny stencil for that. It didn't work out perfectly, but good enough.

I wanted to change the figure's stance slightly, but alas, the other foot wouldn't come off the base, it was glued on too tightly, so I had to compromise a little.

The peg in the leg had corners in them, that I cut off and rounded a little, which then allowed me to rotate the position a little bit, not as much as I wanted, but enough to make a slight difference.


Instead for his traditional red lightsaber, I wanted Maul to have the darksaber, which I thought was going to be easier to do with the materials that I had at my disposal. I cut down and shaped a plastic drink stirrer, took some thin metal wire and hodgepodge it all together with some painters tape and tiny bits of cardboard from a cereal box. I painted the blade black and then used a needle to scrape off the paint for the lightning effect. I glued the pieces together and added some more painter's tape that I then painted over. The bottom part of the hilt comes off, so I can remove the lightsaber from the figure's hand if need be.


At this point, I had made all my preparations, so next up was sculpting the horns to the head. The clay I used was Apoxie Sculpt, which was always highly recommended by many crafty YouTubers. I was sure I would have to order it from Amazon or anywhere outside of Finland, but to my surprise, I  actually found Apoxie Sculpt for sale in a Finnish taxidermy web shop out of all places!


So this was my first time using Apoxie Sculpt and I really like it! It's not too soft and it doesn't cure too fast. In my inexperience, I sure did make a mess while using it, not realizing how hard it is going to be to remove after it's cured. I ended up using Green Stuff to make the mouth and the stud earring for the figure while I waited the first pass of Apoxie to cure. The first layer of Apoxie was to smooth over the head to make it appear bald. I also smoothed over some details around the pants and added a pocket.

On the second pass, I filled the horns. After that cured, for the third layer of Apoxie I shaped and detailed the horns and added the base of the horns. Somewhere along the way, I added a few buttons to the gauntlet and raised the shoulder pads and collar ever so slightly.


After everything was cured and dry, I gave the figure a spray of primer paint. The body was pretty much good to go, but I had to go back and forth with sanding and priming the head many, many times, because there was so much residue all over the figures face from my messy sculpting. Finally, when the head was smooth enough, it was time to move on onto the painting.


Painting the tattoos was what worried me the most. Even while drawing, I never get anything symmetrical, one half of the face is always lower/higher than the other. In order to overcome this fault of mine, I cut out a stencil of Maul's tattoos that I then used as a guide while drawing the tattoos on with a pencil first before painting them.
The end result isn't of course 100€% symmetrical either, but it's far better than I dared to hope for.

I didn't give much thought to the color scheme of the outfit. I knew it was mostly going to be black and dark grey, but I did end up mixing a lot of silver or pearlescent black in order to try to prevent it all from looking too flat.

I had a hart time mixing a good color for the horns, I always thought something's was a bit off. Third time was the charm, I think. I also went over the horns with some black wash, but it didn't turn out as good as I thought it would. I really wanted to get this project finished, so even though I wasn't really satisfied with the horns, I decided to let it go.


The last thing to finish was the base. I had bigger plans for it in the beginning. Like I had this Dino skull and plants prepped for it, but then I started thinking it would look too cluttered, so I left them out. I really wanted the base to have some texture so I added some fine sand that I could get my hands on. I used a paint brush to paint on the water-glue mix onto the base before sprinkling the sand over it and waited for it to dry. I did this a couple of time more, until I was satisfied with the sand coverage on the base. 


Originally I wanted the sand to be gray like volcanic ash, but then I was afraid it would be too much gray for one figure. So I went with a mix of dark red and brown over the sand. I didn't like how that looked either, so I tried going over it some black  wash again, to see if that would help. It didn't. I still don't like the base. Being so close to the finish line, I didn't really see a way for me to improve it. So I accepted the subpar base as it was and called this project done.


I sprayed the darksaber and the black parts of the base with gloss varnish and matte varnish over the rest of the figure.


I kind of would want to make a custom art for the box, but I don't think I have the energy in me. Maybe in the future (or likely never).

Lastly, obligatory comparison between my custom Maul next to the two official Funko Mauls I happen to own.


before & after


perjantai 19. helmikuuta 2021

Tokyo Trip 2 : Day 8 & 9

 Tokyo trip 2

Sat 02.November - Sun.17.November.2019


DAY 8 Sunday, 10. November


The plan for to today was very simple: go to the natural history museum and see the real stuffed up Hachiko. And that's what we did.

On our way to our destination, we walked past the National Museum of Western Art, which is easy, as the two museums are practically right next to each other. Naturally, the art museum had many statues placed outside, most notably the replicas of Auguste Rodin's The Thinker and The Gates of Hell sculptures. Those two  were pretty cool to see in real life and not just pictures. I'm sure the art museum would have been a great place to visit too, but alas, we only planned to see the nature one.


At the National Museum of Nature and Science, as the correct name of the museum reads, they had these automated ticket booths, which made it very easy to buy our entrance tickets. After we got in, I immediately noticed some Gachapon machines, all of them were accordingly themed after the museum exhibits, so no random anime stuff here. I bought four capsules in total and got lucky as I got exactly the ones I wanted; a Hachiko stamp, a miniature Dilophosaurus skull and a Spinosaurus skeleton (the fourth one was a Brachiosaurus skull I got while I was spinning the machine in hopes of getting the Dilophosaurus). Next to the Gachapons was the museum gift shop, we took a quick look around before heading in to see the actual exhibits.


First things first, we came to see Hachiko, so that the exhibit we looked for first. Hachiko is located in the Japan Gallery, north section of the second floor as part of the Japanese People and Nature exhibit. There it was, sharing the glass cabinet with two other dogs. The big fluffy one was named Jiro, but the third and smallest of the dogs was not named at all. Or there was a small sign in Japanese, but there was no English translation for it, so I'm guessing it's only supposed to represent a generic Japanese dog or something like that. I'm curious though about the medal looking thing that the dog has around its neck. 


Hachiko and Jiro both had a plaque with their respective history printed on them, but nothing for the third dog. I'm familiar with Hachiko's story, of course, but as I was reading about Jiro, it seemed familiar somehow. Years and years ago, I've seen the movie Eight Below (2006), which is the very sanitized version of the true story that inspired the movie. I don't remember much of the film, but considering it's Disney, I assume all the dogs survive at the end, unlike in real life where only two survived. While I was looking for info on Eight Below, I also found out there is a Japanese movie of Jiro's story: Nankyoku Monogatari (1983), I haven't seen it, but I'd imagine it might be a more accurate version of the real story.

And while on the topic of movies, Hachiko also has two movies made of him! The one I've seen is Hachi: A Dog's Tale (2009) and then there is also an older Japanese movie I haven't seen called Hachikô Monogatari (1987). I would be really interested to see both Japanese movies about the dogs, but I don't know how easy it will be to find them. I have to look into it.


I was a little surprised that both of Hachiko's ears are standing up. I mean, the famous statue at Shibuya Station has one of his ears flopping down, and you can also see that in many of the photographs of Hachi. I would have assumed that would have been a detail they would have kept for accuracy. But I don't know anything about taxidermy or even the reason for why Hachiko's ear was droopy, so maybe I shouldn't say anything.


So this was the museum of nature and science, but we totally skipped the scientific parts of the museum and just saw the nature exhibits. Of course, the dinosaurs are a must to see. This museum's T.Rex skeleton was a bit odd, because it is posed in a sitting position rather than standing up.

Before leaving the museum, we went back to the shop. Mom had spotted this Hachiko themed tin box filled with chocolates she wanted to buy. I ended up not buying anything, party because there would have been too many things to buy! They had many nice dinosaur models and very cute plushies I was tempted to buy. I told myself, I was happy with the Gachapons I got earlier, I don't need anything else. Besides, this was a museum shop, so the prices were a little bit higher than what I was willing to pay anyway.

After the museum, we planned to wander down the Ueno Park all the way down to Okachimachi. We almost managed to walk a straight line, only to be constantly sidetracked by the interesting sights we spotted on the way. The Ueno Park is huge, and would deserve a whole day on its own for exploration, we only saw a tiny part of it.


First we saw this huge fountain and right next to it was this group of Rockabilly Dancers, we watched for a while. Further along, we came across these living statues surrounded by easels. It looked like it was free for anyone to sit down and start drawing, but I'm not sure. It looked like fun! Not far from the living statues were this huge cardboard box fort, many of them. I was starting to wonder is this a regular thing in here, or did we just happen to be there on a special weekend or something.


We saw a General Grant monument as well as the entrance with all the mini Tori gates to the Hanazono Inari-Jinja Shrine (yes, I totally googled these names afterwards). As we were walking, we noticed these lanterns alongside the main path, that had all unique pictures on them. They really looked like those traditional old wood paintings, I'm sure they would have looked really pretty if they had been lit.


I was playing Pokemon Go as we walked, we stopped next to the Keisei Ueno station when I noticed a special event was about to start in the game, a Cobalion raid. There we dozens of people gathered around to play, unlike in Finland, where you are lucky to even find one other person to join. Cobalion went down quite easily with these many people. I, unfortunately, wasn't able to capture it, because f*ck those Premier balls.

After I finished playing the game, we went by the supermarket to get some food and then started walking back to our hotel. Maybe this was normal, because it was the weekend, but the streets of Okachimachi were packed with people. Like really rush hour amounts of people, never seen anything like it on any of those days we've been to Okachimachi before. We gave up on the idea of walking the whole way back to the hotel and took a train to Akihabara, from where we walked the rest of the way.


DAY 9 Monday, 11. November


Normally, we could see the top of Skytree from our window, but today was a bit drizzly so the tower had disappeared behind some clouds.

Some days earlier, my mom was reading the Japan Times online, and came across this ad for a Star Wars exhibition. We looked into it more and decided to go see it!


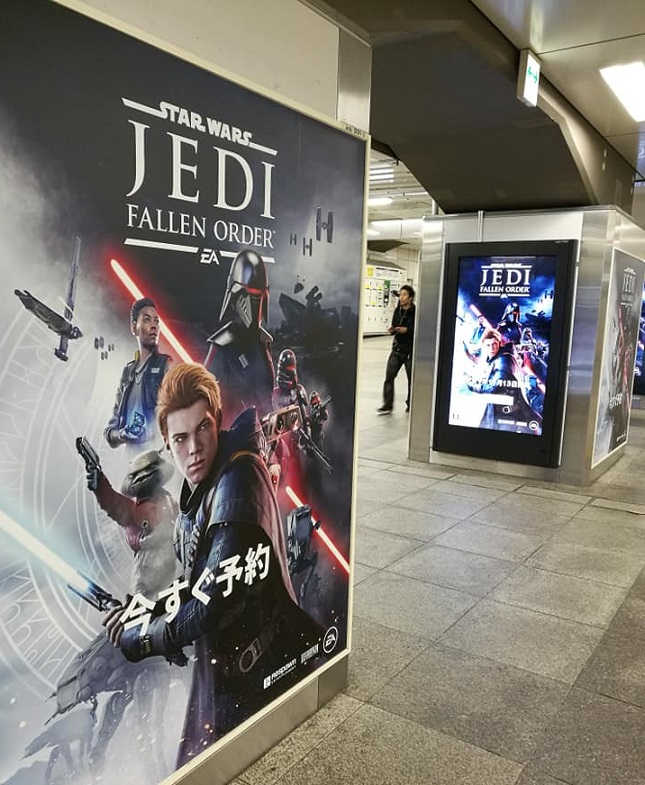
I couldn't help but to notice the posters for the upcoming SW game Jedi: Fallen Order that had appeared overnight all over the Akihabara station. It took about a half hour by train to get to theTennôzu Isle Station in Higashishinagawa where the exhibition was located. From what we saw while walking towards the showroom, this isle had a very industrial vibe to it, mostly just office buildings everywhere. Good thing the gallery had many banners placed out front, so there was no way to miss it!


After we paid the entrance fee, we were handed a wristband and a earpiece. We were given the English version automatically. The way the earpiece worked was that when you were standing in a specific spot in the exhibition hall, a short narration was turned on. Sometimes it was a bit wonky, if you happened to stand close to two narration spots. Just by turning your head could lead to a new voice-over before the previous even finished talking. 

There was no line to the ticket counter, but we didn't get to go to the exhibition hall right away. They waited until there was a bigger group of people, about 10 -15 of us, before we were directed into a cargo elevator that took us down into a dark room. There was an intro to the exhibition projected to the wall and also a quick guide to the earpiece and wristband.


Star Wars: Identities the Exhibition


The exhibition was all about the costumes, concept art, puppets and models they used in the Prequel and Original movie trilogies. The sequel trilogy wasn't finished yet at this point, so it makes sense they were left out. I'd say it was very balanced with the older and newer stuff on display. If I'd have to guess, I would say maybe the was a little more about the Original trilogy placed out, but I didn't keep count. My disappointment was immeasurable when I realized there was absolutely zero Darth Maul memorabilia on display. So boo for that. (Not really)


What about the wristband? Well, the exhibition was interactive in a way. "Choose your own story" type of thing.  There were 10 question stations placed around and you "saved" your answers by placing the wristband in the hexagon shape in the panel.  You got to pick the name, gender, race, background, job, Master and eventually, if you want to go Light side or Dark side. Sometimes the questions were really easy, but a few times they were a bit longer. 


We walked from room to room, answering the questions and (obviously) looking at all the cool stuff. My favorites would probably be all the various concept arts (Yoda used to be a freaking gnome! XD ) If I had to pick another random favorite, I'd choose the big eyes, all that remains of the giant Jabba the Hutt puppet.


In the final room, we placed our wristband in a panel that would read all the information saved on it and then create you an image of your character that was projected on the wall. There was an option to give your email address and they would send the picture there too.


After returning the wristband and earpiece, there really was no other option but to exit through the gift shop. I may or may not have bought a set of postcards, keychain, stickers, a badge (blind bag) and the exhibition catalogue. I would have bought the Darth Maul version of the Identities the Exhibition poster, but they were sold out. Goddammit. Maybe better that way, those posters were huge and I doubt it would have fit in my luggage anyway. So I got the postcard set and stickers as a consolation prize. The metal badge I got in the blind bag had a picture of C-3PO. There was a Maul badge as well, but with my luck, of course I didn't get it.


After finishing up at the gallery we headed for a quick visit to Ginza to see the Shin Godzilla statue. I was expecting it to be bigger, and it was a little disappointing that it was placed up high on a pedestal, so you couldn't take any up close pictures of the statue. I guess it was done to protect the statue from any idiots who would attempt to climb it. I like the Pigeon who was casually sitting on the tip of Godzilla's tail.


From the Godzilla square we walked to the Hakuhinkan Toy Park, which is a huge toy store.  Compared to the Yamashiroya toy store, this one was less crammed and loud, which was nice. It was definitely more like a western toy shop, but I've heard that Ginza has a more western vibe overall, so I shouldn't be surprised. On the basement floor, they had Barbie dolls along their Japanese brands. I don't remember Kiddy Land or Yamashiroya even having Barbies in their selection at all. And the dolls were not those cheap ones you find in everyday markets. Hakuhinkan sold those expensive collector's label dolls that cost like 70€ and more. I saved my money for later and didn't buy anything from Hakuhinkan.


We bought something to eat from a 7/11 convenience store and then decided to head back to the hotel. It wasn't that late yet, after a brief rest at the hotel, we went to Akihabara. Where we visited the huge Yodobashi Camera store. I sort of speed ran through the place just to get a sense what kind of stuff they had on each floor. I ended up only buying two capsules from their huge wall of Gachapon machines. 


Mom stayed in Yodobashi, while I went to Mandarake on another Doujinshi buying spree. I also found a Sonic the Hedgehog Nendoroid and a Yakuza's Kazuma Kiryuu Figma figure I was so close to buying. They were a bit pricey though, so I told myself that I should think it over. So I left them at the store, but still planning to buy them the next time I came over, if they were still there. I went back to Yodobashi to meet my mom. After exiting Yodobashi we came across by accident this tiny shop called Satellite that sold some Star Wars stuff. I bought a Darth Maul acrylic keychain!

Back at the hotel, I found some sports channel that had some compilation of horse gallop racing. That's what I watched for the rest of the evening. We don't have these kind of races in Finland so we were planning to go see and actual race for real, here in Tokyo. But there was another place we had planned to go see first....


to be continued....