
The *insert obligatory excuse of winter depression for why this blog has again been quiet for a few months* here.
Hey! I also made a shitty slideshow video of this project and put it up on YouTube for nobody to enjoy:
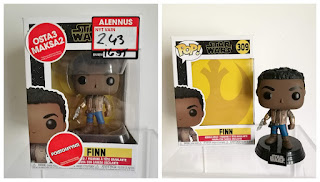
Anyway, it all started when I found this Funko Pop of Finn, Star Wars Episode 9: The Rise of Skywalker -version, during GameStop's Nordic branch going out of business sale. The figures original price was close to 17 euros, but now I got it for only 3€! Can't beat that price!


I have been wanting to make a custom figure for a while now, something more extensive rather than just a repaint with no modifications. So, I thought the best place to start was with a cheap figure of a character I don't particularly care for. (Finn had the potential to be a great character, but they wasted it all in the movies, but I digress...)
Finn was also chosen because the figure happens to have short hair, which meant less work for me when the time came to shave it down to make room for Maul's horns and bald head.


All Star Wars Funkos are bobble heads due to some licensing issue or something. I don't want that. So, I'm going to make the figure a new stable neck with no springiness. The first thing to do was to take the head off.
I pulled on the head to get the metal wire to uncurl enough for me to get some pliers inside to cut the wire. The wire is surprisingly strong and it took some effort to get it all out.

Following the decapitation, I started to shave down the hair texture to get it as flat as possible.

I don't remember what the big idea was why I tried to remove the eyebrows, but the end result was a hilariously huge,messy unibrow.
Next up, I drilled a hole in the closed hand where I wanted the lightsaber to go. For extra detail I also cut out an opening in the holster which was closed off before.


I took a white pen to the head and sketched on the tattoos in order to get a better idea for the placement of the horns. I drilled some holes and put in some metal wire to act as a base for the clay later. I secured the metal wires with hot glue inside the head. In hindsight, I made a real mess inside the head with all the wire and hot glue, which doesn't look pretty at all. That's when I came up with the idea to cover up the neck hole with a plastic cap. It's not perfect, but it does its job.


I used a wooden dowel to make a new neck peg for the figure. I cut the dowel in half, used a pencil sharpener to make the other end smaller to fit in the hole inside the head. I drilled a hole in the dowel and the figure's neck and inserted a metal wire to hold everything in place. The wooden dowel is glued inside the head, but as I was still going to do a lot of work on the head so I never glued the wire to the dowel in order to keep the head removable for now.


I knew I wanted the base to be a little bit different, so in preparation, I removed the Star Wars logo off the base with some acetone and then sanded it down. Instead of the Star wars logo I wanted the base to have Maul's name on it written in Aurebesh (SW universe's alphabet) so I made a tiny stencil for that. It didn't work out perfectly, but good enough.
I wanted to change the figure's stance slightly, but alas, the other foot wouldn't come off the base, it was glued on too tightly, so I had to compromise a little.
The peg in the leg had corners in them, that I cut off and rounded a little, which then allowed me to rotate the position a little bit, not as much as I wanted, but enough to make a slight difference.


Instead for his traditional red lightsaber, I wanted Maul to have the darksaber, which I thought was going to be easier to do with the materials that I had at my disposal. I cut down and shaped a plastic drink stirrer, took some thin metal wire and hodgepodge it all together with some painters tape and tiny bits of cardboard from a cereal box. I painted the blade black and then used a needle to scrape off the paint for the lightning effect. I glued the pieces together and added some more painter's tape that I then painted over. The bottom part of the hilt comes off, so I can remove the lightsaber from the figure's hand if need be.

At this point, I had made all my preparations, so next up was sculpting the horns to the head. The clay I used was Apoxie Sculpt, which was always highly recommended by many crafty YouTubers. I was sure I would have to order it from Amazon or anywhere outside of Finland, but to my surprise, I actually found Apoxie Sculpt for sale in a Finnish taxidermy web shop out of all places!


So this was my first time using Apoxie Sculpt and I really like it! It's not too soft and it doesn't cure too fast. In my inexperience, I sure did make a mess while using it, not realizing how hard it is going to be to remove after it's cured. I ended up using Green Stuff to make the mouth and the stud earring for the figure while I waited the first pass of Apoxie to cure. The first layer of Apoxie was to smooth over the head to make it appear bald. I also smoothed over some details around the pants and added a pocket.
On the second pass, I filled the horns. After that cured, for the third layer of Apoxie I shaped and detailed the horns and added the base of the horns. Somewhere along the way, I added a few buttons to the gauntlet and raised the shoulder pads and collar ever so slightly.

After everything was cured and dry, I gave the figure a spray of primer paint. The body was pretty much good to go, but I had to go back and forth with sanding and priming the head many, many times, because there was so much residue all over the figures face from my messy sculpting. Finally, when the head was smooth enough, it was time to move on onto the painting.

Painting the tattoos was what worried me the most. Even while drawing, I never get anything symmetrical, one half of the face is always lower/higher than the other. In order to overcome this fault of mine, I cut out a stencil of Maul's tattoos that I then used as a guide while drawing the tattoos on with a pencil first before painting them.
The end result isn't of course 100€% symmetrical either, but it's far better than I dared to hope for.
I didn't give much thought to the color scheme of the outfit. I knew it was mostly going to be black and dark grey, but I did end up mixing a lot of silver or pearlescent black in order to try to prevent it all from looking too flat.
I had a hart time mixing a good color for the horns, I always thought something's was a bit off. Third time was the charm, I think. I also went over the horns with some black wash, but it didn't turn out as good as I thought it would. I really wanted to get this project finished, so even though I wasn't really satisfied with the horns, I decided to let it go.

The last thing to finish was the base. I had bigger plans for it in the beginning. Like I had this Dino skull and plants prepped for it, but then I started thinking it would look too cluttered, so I left them out. I really wanted the base to have some texture so I added some fine sand that I could get my hands on. I used a paint brush to paint on the water-glue mix onto the base before sprinkling the sand over it and waited for it to dry. I did this a couple of time more, until I was satisfied with the sand coverage on the base.

Originally I wanted the sand to be gray like volcanic ash, but then I was afraid it would be too much gray for one figure. So I went with a mix of dark red and brown over the sand. I didn't like how that looked either, so I tried going over it some black wash again, to see if that would help. It didn't. I still don't like the base. Being so close to the finish line, I didn't really see a way for me to improve it. So I accepted the subpar base as it was and called this project done.

I sprayed the darksaber and the black parts of the base with gloss varnish and matte varnish over the rest of the figure.


I kind of would want to make a custom art for the box, but I don't think I have the energy in me. Maybe in the future (or likely never).
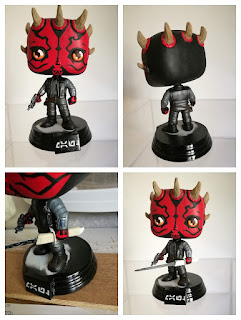
Lastly, obligatory comparison between my custom Maul next to the two official Funko Mauls I happen to own.


before & after
