Näytetään tekstit, joissa on tunniste DIY. Näytä kaikki tekstit

perjantai 29. kesäkuuta 2018

AvP Box


Pretty self explanatory, but anyway, I made a storage/display box for my Aliens, Predator and Aliens vs. Predator comic albums.


I salvaged the materials for the box itself from and old furniture we were getting rid of. My dad helped me with this by cutting the pieces and building the box. I painted the whole thing black and then I decorated each side of the box with a picture collage.


topside & backside

I started making the collages by taking hundreds of pictures of pages/panels from the comics (these books are way too thick to fit in a scanner) and then putting it all together using Photoshop. I printed out the collages and laminated them. I used spray glue to attach them to the sides of the box.

The inside of the box is covered with marble patterned contact film (D-C-Fix). I really would have wanted to use black marble pattern, but I couldn't find it in any shop at the time.


I have to mention how HEAVY this thing is. The books by themselves already weigh 8,6 kg and with the added weight of the box, it comes to a total of 11,2 kg all together. That's crazy!

Here below are the collages I made for better viewing as they didn't register well on my photographs above. As always, right click and open the image in a new tab for full size view.
side 1

side 2

Topside 

Backside


tiistai 10. toukokuuta 2016

Something for Mother's Day


A little gift that I made for guess who, in honor of Mother's Day. 


I bought this glitter deer ornament at a flea market. Let me tell you, getting all that glitter off was a real pain in the butt. I don't know how many days I had the poor thing soaking in water, which didn't even help very much. I ended up using cotton swabs dipped in nail polish remover and some toothpicks to get it all scraped off.


It took forever, but I got all the damn glitter off! I never noticed that the deer had a bow around its neck with all the sparkliness on.


Other materials were a reshaped cocktail drink stirrer and an old cut off bedpost.  Some universal glue, matte black spray paint, silver acrylics and finally some glossy varnish to top it all.


The final result:


maanantai 29. helmikuuta 2016

PEZ Dispenser Display DIY

So here's a making of that PEZ display stand (Yup, made it myself! ) seen in my last post, but here's the same one again in case you don't feel like checking the previous post. Tadaa! The display is (lol!) designed to hold 17 PEZ dispensers in total, hence the gaps. As seen in this picture, it can hold a lot more just without the stability like the one standing in the gaps have.


A disclaimer: I am an amateur and I don't know what I am doing. I don't know what the tools are called and even don't know what my material is. Sorry for that and I have to also apologize for the poor quality of the photos, sorry!


I started with a prototype using such fancy materials as frozen pizza boxes and old VHS tapes, it was very flimsy as best, but it helped me with some measurements and get a better hang of what I was trying to make. Following that, I made a small test piece of the material I was going to use for the finished product.


I'm not 100% sure about this, but I think the material I'm using is called paperboard. Why am I using it? Because it was free! There was this big piece of it loitering around the house so I decided to make something out of it.  The paperboard I'm using is almost 1 cm thick, but I think a thinner material would also work, as long as it is sturdy enough to withhold the combined weight of the dispensers. The basic tools I used to cut out the display are a regular saw, figure saw (?), a hammer and those three things  seen in the picture.


Making a gap for the foot of the PEZ dispenser in this picture. Maybe "those three things" are some kind of woodcarving tools, I guess? Don't know their actual names, though. Unfortunately, I don't have three hands, so I left the woodcarving thing standing there on its own for the picture. Obviously I was keeping it steady with my other hand, when I whacked it for real.


Assembly! I used again the trusty old VHS tapes to support the thing while the glue was setting.  Yes, those erasers have a purpose for laying there. They are counter weighting the "steps" that were tipping over before the glue hardened. I used universal glue meant for wood, plastic and whatnot for assembling this thing, and it's doing the job well, nothing has come apart as of yet. I couldn't bother taking any photos while my hands were covered in glue, so these pictures of the assembly have been taken before I added the glue! Just to see how it looked. You get the idea, right? Do keep your candy dispensers far away from the glue as well. They have no purpose being there as long as the glue is still wet.


Don't know if these will be helpful to anyone, but here are my not so sophisticated blueprints for my display stand in PDF. Paper size is A3!

1. https://drive.google.com/file/d/0B5xpVY1vl496Z211UmdvbTZ0SWc/view?usp=sharing&resourcekey=0-LIuDLN-axNCpOKUJeJe0ww

2. https://drive.google.com/file/d/0B5xpVY1vl496N09PcVp0VGhKaFE/view?usp=sharing&resourcekey=0-JW3O-C0hPGBG2XU4yHlyTw


All six parts with their label from the blueprints.


perjantai 11. joulukuuta 2015

A piece of Moomin winter


Let's take a quick look at some screenshots from the Moomin TV series episode 22  titled "Moomin and Little My's Adventure" (Mumintrollet upplever vintern / Muumipeikon ja Pikku Myyn talvinen seikkailu). This episode is one of the many, that I thought was too scary as a kid. Still to this day, I think it's creepy, but in a beautiful kind of way.... if that makes sense.


"Moomin and Little My's Adventure" is the one and only episode in the series where Lady of the Cold makes an appearance (I seriously thought that her English name was "the Ice Maiden", but I was wrong), and she is of course the source of all the creepiness in the episode. And then there's that snow horse that comes to life..... such a majestic creature! I'd seriously watch that all day while listening to Walking in the Air, instead of The Snowman (although it is a beautiful animation as well).

Anyway, why the mini nostalgia trip with the episode? Because, through a tip from a Facebook group, I found this selling in stores now:


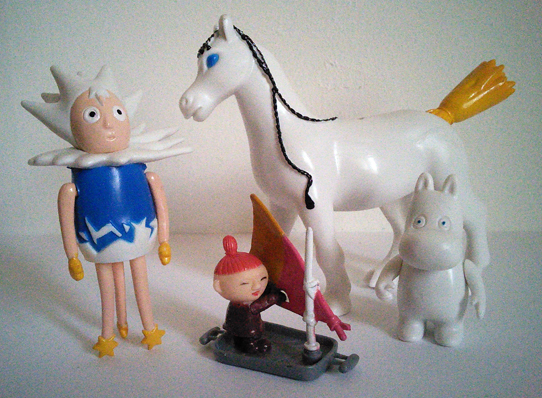
The packaging looks very cheap and the paint job on the figures is far from great, but hey, it's intended for kids, they don't care! Or do they? The set contains 5 pieces; Lady of the Cold, Moomin, Little My, Snow Horse and switchable legs to the Lady. The most astonishing thing is that they got her name wrong in Finnish! The backside of the box claims that she is called "Jääkuningatar" (Ice Queen), while it should be "Jäärouva", unless of course they've changed the official translation of her name, which I doubt.


There's one thing that bothers the heck out of me on the Lady Cold figure, I don't mind the blueish dark purple on the torso, it's the awful flesh tone on her arms, legs and face that I think is ugly. So I played around in Photoshop and switched the colors around, now matching closer to her anime appearance.  Not sure if it improved anything, but at least  I find it easier to look at. Hmm..... and now I'm tempted to repaint the figure. Curses.


Someone might remember that I bought this loose Snow horse at the Old Toy Swap in October. Now I finally decided to fix its missing tail problem. On the butt of the figure was this small peg, where the tail used to go. I sawed it off, because I needed to make a hole there where the peg used to stand. I got the hole started simply with a nail and a hammer, after that I switched to a screw and  a screwdriver to make the hole deeper.  Once the hole was deep enough, I removed the screw and replaced it with a piece of a barbecue stick. After that, I tied together this small pile of oat straws (that I took from our stable) around the  new base of the tail which, amazingly was the hardest part of the whole process. Once I finally got the miniature knot tight enough that the straws wouldn't fall off, I sealed the knot and straws together with a glue and water mix.


Comparing the tails side by side.... the new tail is slightly too long, but considering the amount of frustration that went into making it, I'd still give it the thumbs up and call it a day.


Before I go, I'll leave you with this lovely image, which is easily the creepiest moment of the earlier mentioned episode. Enjoy!


keskiviikko 9. joulukuuta 2015

Super Exciting Plate Display!


Nothing extravagant exactly, but still, this is something I've wanted to do for  a while. Last Christmas I got this Darth Vader plate as a gift and I didn't want to use it for its intended purpose but rather to have it on display. However, getting a hold of a plate stand like this proved to be surprisingly difficult. All my searches proved fruitless, until I finally found this plain wood one in a shop for hobby and craft materials. The unfinished wood was perfect to  be painted over,  I then painted with acrylics the inside black and the outside red, finished with a Vader print from a stamp. My life is far from complete! 8D


torstai 29. lokakuuta 2015

Frame this


I had some pictures that needed framing, so I took some measurements and headed off to a flea market in hopes of finding fitting frames for cheap. I came home with three frames that suited my needs as I was planning all along to repaint them, for them to better match their intended pictures.

I had this paper bag with the motifs that appear in Tove's Jubilee mug illustration.
I cut the images out and carefully removed the handles on the back side of each image and framed them individually.

Taking a peek on the backside of the wooden frame reveals it to be originally from Ikea. This frame was the exact size I needed, I barely had to cut the image to make it fit. I was trying to match the color of the frame to the flowers on the right side, lower corner and I think it turned out pretty good.

With this, my reference for the frame's color were those blue flowers in the picture. In reality, those flowers are more like a grayish light blue in color and the frame is plain light blue, even though I really tried to get some gray in there. The reason for those white flowers along the sides.... I accidentally scraped off a tiny area of paint so that the original white color showed underneath. I didn't have any of the blue left and I didn't want to go through the pain of mixing it again, so instead I covered it up with those flowers.

The (plastic) frame looked nice as it was in silver, but a golden frame just looked better for this Ian McCaig's concept art of Queen Amidala, that I've printed out.

..... and with the leftover paint from mixing the colors for the frames I painted this (and right after, I really could have used all that blue color.....).

lauantai 10. lokakuuta 2015

Japan Candy Box pt.2


All items ordered from Blippo Japan & Kawaii Shop


Lotte Pokemon Soda Candy - 5 pack
"The candies are super tasty - just place one in your mouth and the candy will start to fizz!" 

These candies come in 5 different flavors; pineapple (Pikachu), melon (Chespin), cola (Fennekin), soda (Froakie) and grape (Espurr). I would describe these candies consistencies as very "powdery", they melt pretty fast once you bite into them. Oh, and there is no fizz whatsoever, what a let down. Taste wise, I've already mentioned that I don't tend to like pineapple & melon and that holds true in this case as well. The pineapple flavoured ones are absolutely disgusting (IMO), while the melon is tolerable. The cola candies do taste like a drink of cola. Although it feels a little bit weird having the taste of cola (/soda) in your mouth and yet you are still thirsty! I'd say the grape flavour was best out of the bunch. Still, definitely not worth buying again.


Coris Wakuwaku Animal Soft Candy DIY 
"Do-It-Yourself set for designing your own cartoon animal candy from delicious strawberry and lemon flavored candy materials!" 

Right off the bat, the candy material or dough as I like to call it was very good! If you are feeling lazy, you can just eat the candy dough roll instead of bothering pushing it in the molds to make cute animal characters for you to eat. That's pretty much what I ended up doing, because the mold was super tiny! Seriously, I should have used tweezers if I had wanted to make these lollies perfectly cute like shown on the packaging. Obviously, I didn't have the nerves, and that's why my super cute candy animals ended up looking like total abominations. 8D
The package included a mold with 2 animals (mine had the mold for a lion and a panda. ), 2 candy materials and 4 sticks. In total there are 4 different molds available and each package will include one of them randomly.


Moko Moko Mokolet Candy Toilet 2 DIY 
"With Moko Moko Mokolet Candy Toilet you can make a foamy sweet drink bubbling out of the toilet bowl! Kawaii or gross?" 

Inside the box you will find a brightly colored mini toilet (which requires a little bit of assembling), a few stickers in case you feel the need to decorate your new lavatory and two bags of flavoured powder. Once you've assembled your toilet all you need to do is pour one of the sachets of powder into the toilet, then just add some water and wait for the foam to rise. My box had cola (red) and melon (green) flavoured powder (although the melon tasted more like apple to me). I wonder if  they have other flavours available?
I had no idea of what to expect from this, other than that the whole concept is a bit absurd. I was pleasantly surprised! The drink was actually pretty damn good because it was so sour! X) 
The only complaint that I have is that there isn't much to drink, because the mini toilet can only hold so little. I want moaarrr! Heck, the toilet is just a gimmick, just let me buy that powder separately and I'll be happy!


tiistai 23. joulukuuta 2014

Snowflakes

Last year I came across this awesome site Anthony Herrera Designs.com where you can find these amazing designs for Star Wars themed paper snowflakes! How could one possibly resist to try this out? I sure couldn't! There were many characters and vehicles to choose from, but I settled with the Stormtrooper, Scout trooper, Yoda, Darth Vader and Boba Fett snowflakes. The end results do look fantastic, albeit they are a little fragile and your hands will be totally destroyed (at least mine were) after cutting these out! Still totally worth it! If you place the snowflakes in a window that has a light source nearby on the outside, you get this very decorative shadows as an added bonus! I didn't even think about the street light outside when I hung these up, the shadows were an unexpected surprise on a dark winter morning!


Like an annoying fangirl that I am, I was a little disappointed that my favorite character wasn't among Herrera's designs, but at least that gave me the excuse to try make my own Darth Maul inspired snowflakes! I don't think mine are nearly as good as Herrera's, but I tried! If nothing else, at least I made some pretty snowflakes even if you can't see Maul in them..... :'D
I broke it!


Bonus: a non SW-snowflake! Lordi logo!